Chapter 2 Advanced Word Processing
Contents
Chapter 2 Advanced Word Processing
What’s
wrong with this document
Character Formatting
You can format your characters in any way that you want. Each character can be different. You simply highlight the character(s) that you want to change and then make the change(s).
|
W |
hat can YOU do to make the world a better place? After all it starts with you! Only you can make a difference.
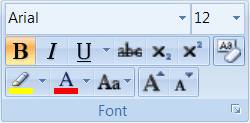
Here I used most of the features that I can think of! A lot of the features can be found in Font Group under the Home Tab.
 Font -
is the style of the letter that you have chosen.
Font -
is the style of the letter that you have chosen.
Drop Cap - Is found under the Insert Tab, Text Group, Drop Cap. Allows you to have the ‘W’ in this case to be a larger size and drop down a few lines.
Larger Size - ![]() The rest of ‘what’ I simply made to a larger
size. The easiest way to do this is from the Font Group and
clicking on the Increase Font Size
icon. You can also click the down arrow and choosing the size that you want. Here
I used a font size of 14 pt. The larger the font size the larger the
characters. There are 72 points per inch in WORD.
The rest of ‘what’ I simply made to a larger
size. The easiest way to do this is from the Font Group and
clicking on the Increase Font Size
icon. You can also click the down arrow and choosing the size that you want. Here
I used a font size of 14 pt. The larger the font size the larger the
characters. There are 72 points per inch in WORD.
Bold - ![]() is always an option that is available on
the Font Group under the Home Tab.
is always an option that is available on
the Font Group under the Home Tab.
Superscript - ![]() ‘can’ is raised above the center of the line
so therefore it is in superscript. Normally you use superscript for
mathematical formulas and footnotes. I was being creative here. Think of
superscript as superman above.
‘can’ is raised above the center of the line
so therefore it is in superscript. Normally you use superscript for
mathematical formulas and footnotes. I was being creative here. Think of
superscript as superman above.
Change Case - ![]() ‘you’ was simply typed in lower case letters
and I decided to have them as all capital letters. Instead of retyping them I
simply highlighted the word you and clicked the button.
‘you’ was simply typed in lower case letters
and I decided to have them as all capital letters. Instead of retyping them I
simply highlighted the word you and clicked the button.
Underline - ![]() is an option that is easily available on the Font Group under the Home Tab.
is an option that is easily available on the Font Group under the Home Tab.
Subscript - ![]() ‘make’
is lowered below the center of the line so therefore it is in subscript.
Normally you use subscript for mathematical formulas. Again I was just being
creative here. Think of subscript as a submarine below.
‘make’
is lowered below the center of the line so therefore it is in subscript.
Normally you use subscript for mathematical formulas. Again I was just being
creative here. Think of subscript as a submarine below.
Small Caps - is
a neat feature that makes capital letters the size of lower case letters. ‘The’
is in small caps, a feature found in Font![]() .
.
Italics - ![]() is an option that is easily available on the Font Group under the Home Tab.
is an option that is easily available on the Font Group under the Home Tab.
In the case of the word better I fooled around and mixed the different effects all in one word! So do not feel that you have to format an entire word the same way. With a word processor you can create many different effects[1].
 As
you experiment with the many things that you can do, let me tell you about the
Undo feature. The undo feature will undo whatever you last did. So if you
format a word and do not like it, simply choose
As
you experiment with the many things that you can do, let me tell you about the
Undo feature. The undo feature will undo whatever you last did. So if you
format a word and do not like it, simply choose ![]() the Undo Button on the Quick Access Toolbar.
Be careful with using the undo feature as you may undo more than you
planned! The safest thing to do is to save your document before you make
changes. This way if you do not like the changes you have made, simply close
the document and DO NOT save the
changes. This is a sure fire approach that works for all software packages.
However, the Undo feature can be very handy to use. Try it a couple of times
and look at the redo/repeat[2]
the Undo Button on the Quick Access Toolbar.
Be careful with using the undo feature as you may undo more than you
planned! The safest thing to do is to save your document before you make
changes. This way if you do not like the changes you have made, simply close
the document and DO NOT save the
changes. This is a sure fire approach that works for all software packages.
However, the Undo feature can be very handy to use. Try it a couple of times
and look at the redo/repeat[2] ![]() feature as well.
feature as well.
Tabs
In the last chapter we briefly mentioned setting a tab stop. Let’s take a closer look at tabs and how to use them correctly. For starters when using tabs you need to have a left aligned (or justified) paragraph. Tabs are a paragraph formatting feature, which means they are in place for the entire paragraph. As with most everything else if you want to change the tab stops for several paragraphs at once you must highlight all the paragraphs. Lastly you never hit ‘tab’, ‘tab’ but instead only hit the tab key once and then set the tab stop. The reason that you use a tab instead of aligning the information with the use of multiple tabs and or the space bar is that when you print your document it may not line up correctly, where as with the tab it always will.
Let’s look at the tab dialog box and go over it in detail.
You can see this dialog box by choosing Tabs… (Command
button) on the Paragraph![]() Options in the Paragraph Group
under the Home Tab. I have already set four tabs
and they can be seen on the ruler shown below and the dialog box shown to the
left. The Tab Stop Position: is the text box where you would type in the number for your tab
stop. I have set tabs at 0.56”, 2.06”, 3.69”, and 4.94”. You can see these tabs
listed in the list box. If you need to change a particular tab setting you
would click on the tabs position in the list box and that would automatically
place the position in the text box. You can then make the change desired. The
tab position is measured from the left margin. You do not need to type the “ mark.
Options in the Paragraph Group
under the Home Tab. I have already set four tabs
and they can be seen on the ruler shown below and the dialog box shown to the
left. The Tab Stop Position: is the text box where you would type in the number for your tab
stop. I have set tabs at 0.56”, 2.06”, 3.69”, and 4.94”. You can see these tabs
listed in the list box. If you need to change a particular tab setting you
would click on the tabs position in the list box and that would automatically
place the position in the text box. You can then make the change desired. The
tab position is measured from the left margin. You do not need to type the “ mark.

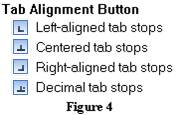
You need to pick an alignment for your tab stop. They are pretty self-explanatory as you can see on the ruler. When you have a left tab you can see how the L (in Left) is aligned with the tab stop, in comparison with a right tab you see the t (in Right) is aligned with the tab stop. Notice that between the nt in Center is aligned with the tab stop. If you are setting a tab for a numerical value you should use a decimal tab even if you use whole numbers. You can see that in the number 1.34, the decimal point is aligned with the tab stop. If there is no decimal the computer assumes it is at the end of the number. The computer knows where the decimal would be and will align your numbers up correctly. Lastly notice the little tick mark under the ruler which identifies a default tab stop.
In the above examples I have not used a tab leader in any of the tab stops, so for now just choose none. We will talk about these in a few minutes.
There are three new command buttons, Set, Clear, and Clear All. If you want to set or change a tab stop you must choose Set BEFORE you choose OK; otherwise no changes will take place. Clear will clear or delete the tab stop that is located in the position text box. Clear All will clear all of the tab stops. You can clear a tab with your mouse by clicking and dragging the tab mark above the ruler and letting go of the mouse button. After you have Set or Cleared then you may choose the OK button if you are done.
You can set the Default Tab Stops: if you need to. Simply use the arrows to scroll until you get to the number you are interested in; or just type it in the text box. Currently the default tab spacing is at 0.5”. You will notice on the ruler that the first default tab marker showing is at 5.5” and 6”. When you set a tab stop it automatically deletes any default tab stop before it. For example if we set a tab stop at 3” there will be no default tab stops before 3” inches, the first default tab stop would be at 3.5”.
 Looking at the ruler you will notice the
tab alignment button on the far left. Currently this is the
tab marker for a left aligned tab. If we click with our mouse to set a tab stop
on the ruler it will be a left aligned tab. To change this we can click on the
tab alignment button and get any one of the four different tab alignments as
shown in Figure 4. These are the same marks that are shown on the ruler.
Looking at the ruler you will notice the
tab alignment button on the far left. Currently this is the
tab marker for a left aligned tab. If we click with our mouse to set a tab stop
on the ruler it will be a left aligned tab. To change this we can click on the
tab alignment button and get any one of the four different tab alignments as
shown in Figure 4. These are the same marks that are shown on the ruler.
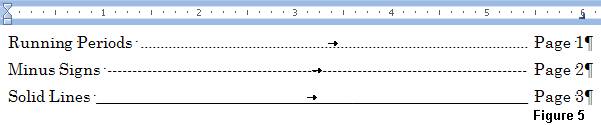
 A Tab Leader is a line that will go from the place you hit
the tab key to the specified tab stop. Look at the ruler in Figure 5 and
you can see I have a right aligned tab stop set at 6”. Each line is a separate
paragraph as well as a different tab leader so that you can see several types.
You will notice that I put a space (by hitting the space bar) before I hit the
tab key and after. I will often do this before and after I hit the tab key for
cosmetic reasons; I think it looks better. You obviously will need to decide
for yourself. Tab leaders are commonly used on a table of contents page.
A Tab Leader is a line that will go from the place you hit
the tab key to the specified tab stop. Look at the ruler in Figure 5 and
you can see I have a right aligned tab stop set at 6”. Each line is a separate
paragraph as well as a different tab leader so that you can see several types.
You will notice that I put a space (by hitting the space bar) before I hit the
tab key and after. I will often do this before and after I hit the tab key for
cosmetic reasons; I think it looks better. You obviously will need to decide
for yourself. Tab leaders are commonly used on a table of contents page.
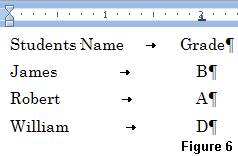
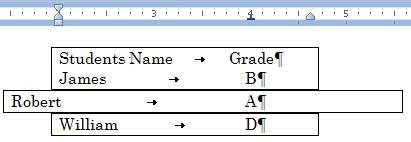
Let’s look at a couple of examples of when you would use tabs. In Figure 6 I wanted to make a simple list of students and their grades. I simply set a center tab at 2” for all the paragraphs. When making a table like this you will notice that each line is a separate paragraph.
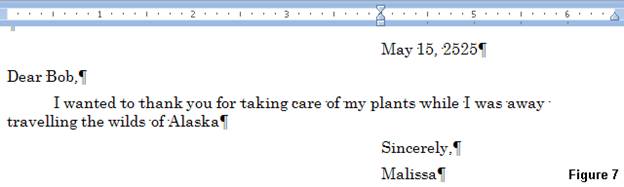
When writing a letter using this common format as shown above in Figure 7, you want to be sure and align your heading with your signature. You should use indent settings and NOT a tab setting. If there is no text to the left it is an Indent and not a tab.
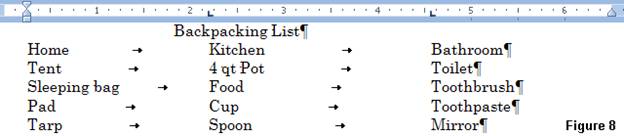
You will notice in Figure 8 that I used the indent for the first column and tab settings for the next two. It is not wrong to use a tab twice or even three times on the same line as long as they are not one after the other. I have used left aligned tabs to set up my columns for Kitchen and Bathroom.

Sometimes you will want to have text both left aligned and right aligned on the same line. The only way to do this is to set a right aligned tab at the far right of the ruler. In this example Figure 9 I wanted the date to be right aligned. You do have to be careful because if you change your margins the date will not be right aligned at the margin anymore and you will have to manually move the tab mark. You can easily move the tab marks by using a click and drag motion with the mouse.
|
|
|
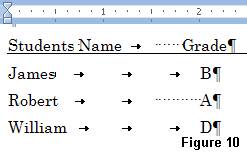
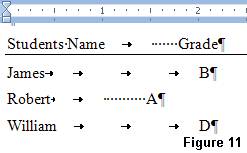
Let’s look at some examples that have been done incorrectly and talk about why. In Figure 10, the student grade list, I incorrectly used the tab key three times in a row and used the space bar to move the letter grade over. In Figure 11 I simply highlighted the whole thing and changed the font from Century School Book to Times New Roman. You can see that Robert’s grade jumped back to the left. Had I used the tabs correctly I could have made this change without a problem. Now I have to go back and edit this to make it look it right.
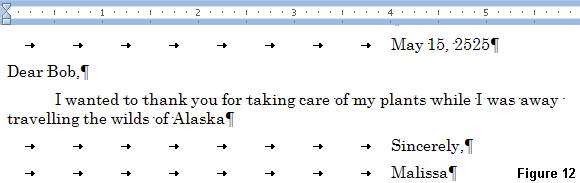
In Figure 12, I have repeatedly hit the tab key to align the information at 4 inches. If I decided to change my font size the same thing will happen as it did before. Actually it is hard to hit the tab key so many times in this instance because most of the time WORD automatically inserts an indent.
![]() A common error in using tabs is to set too
many. You should delete any unnecessary tab stops. In Figure 13 I only
wanted a left tab stop at 1”. I was click happy with my mouse so I have three
extra tab stops! You should delete the extra tabs by click and dragging them above
or below the ruler.
A common error in using tabs is to set too
many. You should delete any unnecessary tab stops. In Figure 13 I only
wanted a left tab stop at 1”. I was click happy with my mouse so I have three
extra tab stops! You should delete the extra tabs by click and dragging them above
or below the ruler.
Paragraph Formatting
 When you create a table using tab stops,
you will want to keep the table together on one page. Often times what will
happen is that the middle of your table falls on the page break. There is a
paragraph formatting feature that can keep your table all on the same page
automatically. We need to look at the Text
Flow,
which is part of the paragraph dialog box on the Paragraph
When you create a table using tab stops,
you will want to keep the table together on one page. Often times what will
happen is that the middle of your table falls on the page break. There is a
paragraph formatting feature that can keep your table all on the same page
automatically. We need to look at the Text
Flow,
which is part of the paragraph dialog box on the Paragraph![]() Options in the Paragraph Group
under the Home Tab. Notice I clicked on the Line and Page Breaks tab
Options in the Paragraph Group
under the Home Tab. Notice I clicked on the Line and Page Breaks tab
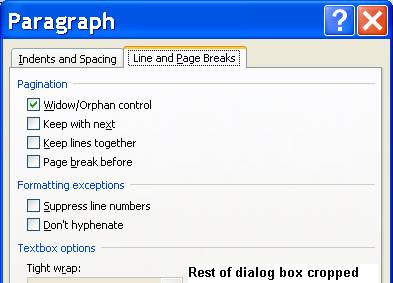
The options I want to talk about are Keep Lines Together and Keep with Next. The other options are not in the scope of this course but you can simply choose help and read about them; they may be important to you.
Keep Lines Together is used to prevent a paragraph from breaking in two parts at the page break. If you format your paragraph as keep lines together, then if that paragraph is split in two with half of it on one page and half of it on the next page[3] this feature will automatically move the entire paragraph to the next page. This is useful if you are typing a quote and would like to keep this information together. It pays to format the paragraph regardless of where it is in relation to the page. This is because you may make revisions to your document that would push the quote over the edge of the page and you may not notice it. If you start to use columns (next chapter) keep lines together will cause the text to go to the next column.
In the case of a table, each line would be a separate paragraph. In this case we simply highlight all but the last paragraph and format these as Keep with next. This will keep all the paragraphs together automatically moving the whole group to the next page. The reason that you do not highlight the last paragraph is because the feature is keep with next, and you do not care if the following paragraph goes on to the next page since it is not part of your table.
Word processors allow us to format text in most any way that we want. We can also format the paragraph in various ways to make them stand out. There are several things that we can do. It is common to take a quote and have it look something like this quote in Figure 15.
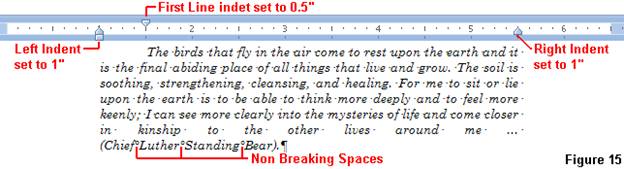
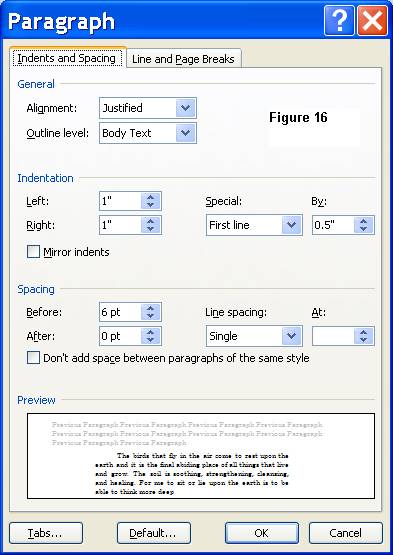
The first thing that I notice is that the paragraph is all in italics. Instead of having a left-aligned paragraph I chose to use a full justified paragraph meaning both the left and right sides are smooth. I do not recommend having an entire paper with full justification, as it is harder on the eyes than plain left alignment. The other main difference is the paragraph indents. I have set the normal 0.5” first line indent[4] but I have also set the left indent to 1” and the right indent to 1”. You can easily see this on the ruler for this paragraph as shown in Figure 15. It is not proper style to break a persons name so I used non-breaking spaces (Ctrl+Shift+space bar, or Insert tab, Symbols Group, Symbol, More symbols, Special Characters)
 To format this
paragraph, simply put the cursor on the paragraph that you want to change[5]
and choose Format, Paragraph....
Then set the left indent to 1”, the right indent to 1” and the first
line indent to 0.5” as shown in the dialog box Figure 16. Also notice that
I have set the Line spacing and the paragraph alignment as well.
To format this
paragraph, simply put the cursor on the paragraph that you want to change[5]
and choose Format, Paragraph....
Then set the left indent to 1”, the right indent to 1” and the first
line indent to 0.5” as shown in the dialog box Figure 16. Also notice that
I have set the Line spacing and the paragraph alignment as well.
Borders
Another new feature is putting a border around a paragraph.
You can specify a border on just the top, bottom, left, right, or any
combination. Just look at the ![]() in the Paragraph Group under
the Home Tab to see all your options. To
get the dialog box Figure 17 just choose the last item in the list Borders
& Shading ….
in the Paragraph Group under
the Home Tab to see all your options. To
get the dialog box Figure 17 just choose the last item in the list Borders
& Shading ….
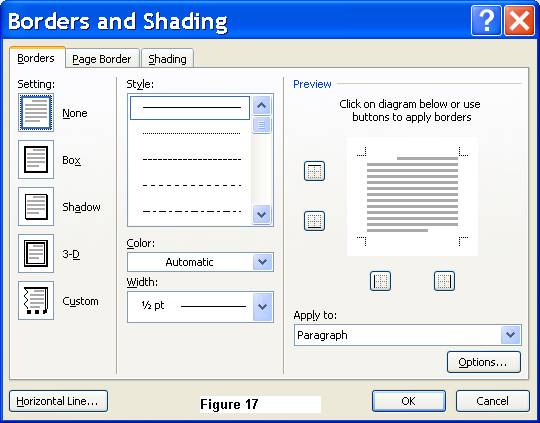
Most of the dialog box you should be able to understand without any further explanation. If you want a border all the way around your paragraph you simply choose the preset box border. You can then change the width of the line, the distance the border is from the text, and the line style; whether it is a solid line, double line, or a dashed line. We have not discussed color yet but I am sure you can figure out how to change the color of your borders. Here is a border around an entire paragraph.
 Border around the paragraph!
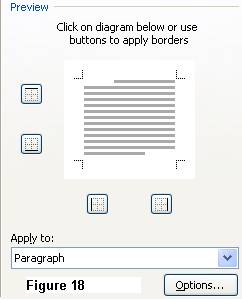
I would like to talk a little about the Border section of the dialog box. This is the section in
which you can specify a border for the different sides individually. You will
notice several shapes (![]() )
around the sample text. If you click between these marks it will put the border
type that you have specified between the two marks. If you click between the lines again it will
remove the border. You can have each border different. For example, you could
have a single line on the top and a double line on the bottom. The border
section would look like Figure 18. It can be a little tricky but after you
try it a few times I think you will get the idea.
)
around the sample text. If you click between these marks it will put the border
type that you have specified between the two marks. If you click between the lines again it will
remove the border. You can have each border different. For example, you could
have a single line on the top and a double line on the bottom. The border
section would look like Figure 18. It can be a little tricky but after you
try it a few times I think you will get the idea.
Remember that borders are a paragraph feature and if you want the border to be smaller in size you will need to change your left and right indents. The following border is around a paragraph that has both the left and right indent set to 2”. The paragraph is also centered. The border is a little smaller than the previous example.
Border again.
Hanging Indent
 In the last
chapter we talked about setting your first line indent at 0.5” to start your
paragraphs. You can set your first line indent to -0.5” and your left indent to
0.5” to create what is called a hanging indent. You would use this format
for a bibliography.
In the last
chapter we talked about setting your first line indent at 0.5” to start your
paragraphs. You can set your first line indent to -0.5” and your left indent to
0.5” to create what is called a hanging indent. You would use this format
for a bibliography.
When you choose Hanging it automatically makes the first line a negative number, therefore you choose 0.5”. This will also automatically set your left indent to 0.5”. Let’s look at the paragraph dialog box Figure 19 as it would look for a hanging indent. Your left indent is set to zero but if you look at the ruler it will be set at 0.5” (the word Hanging takes care of it all).
We simply choose Special, Hanging, and put the By to 0.5”. In the old days this was done by setting the left indent to 0.5” and the first line indent to ‑0.5”. In either case this is what the ruler displays so that is why I am telling you. Here is an example Figure 20 of a hanging indent and what the ruler would look like.
You will notice that the second line is spaced over to the 0.5 mark on the ruler and the first line is -0.5” from the left indent. Remember the first line indent is measured from your left indent.

Another example of a hanging indent would be a bulleted[6] item on your resume Figure 21. I just
clicked on the Bullets icon ![]()

Now you can create a hanging indent larger than 0.5 inches.
In Figure 22 I have set the hanging indent to 1”. If I read the ruler, I
have a left indent of 1”, a first line indent of -1” and I also have set a left
tab, with a leader, at 0.63”[7]:
This example also uses several forced line breaks to keep all the lines as one
paragraph.

A Forced Line Break is used when you want to continue the same
paragraph but on a new line. This is done by pressing Shift+Enter. The non-printing character for a line break looks like
this![]() .
There are not many times that you need to use a line break but I have used them
on the sample above. You may find that you need to use one sometime.
.
There are not many times that you need to use a line break but I have used them
on the sample above. You may find that you need to use one sometime.
When you create a bibliography, you need to start a new page. You can force a paragraph to start a new page by inserting a page break. The easiest way to do this is by pressing Ctrl+Enter. I do not recommend using a forced page break except for your bibliography page. A forced page break does not conform to the basics of word processing. In the pursuit of using less paper use your judgment as to whether it really is worth the paper to have your bibliography page all by itself. It may be feasible to simply set space before to 18 or 24 pts. To set the bibliography by itself, thereby saving a piece of paper.
Headers & Footers
A lot of times you want to insert page numbers in your document. This is best done with the use of a Header or Footer both found on the Insert Tab. A header will show up on the top of every page. Footer will show up on the bottom of every page. You can suppress the header and footer so they do not show on the first page.
 If you want to have only page numbers, all
you need to do is to choose Page Number from
Header & Footer Group of the Insert Tab. This will give you several
options to choose from each of course with a sample and each one will put the page number code in place. If you already have text in the
header or footer, be sure to just choose Current
Position otherwise they tend to delete whatever you have typed in.
If you want to have only page numbers, all
you need to do is to choose Page Number from
Header & Footer Group of the Insert Tab. This will give you several
options to choose from each of course with a sample and each one will put the page number code in place. If you already have text in the
header or footer, be sure to just choose Current
Position otherwise they tend to delete whatever you have typed in.
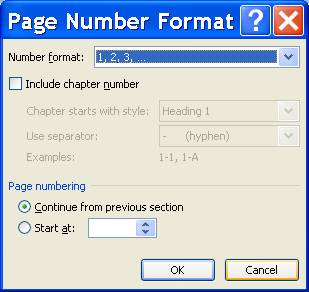
If you need to format the page numbers then choose Format Page number at the bottom of the list to get the dialog box shown. You can then specify whether you want 1, 2, 3 or A, B, C, or I, II, III, etc. This is also where you would specify what you want the first page number to start with.
Your header and footers will always show as grayed out but if you double click them the main body of your text will become grayed out and the header or footer will be become darker text which you can then edit as you need to. You will also see the Header and Footer Design Tools as shown below with all the associated tools you can use.
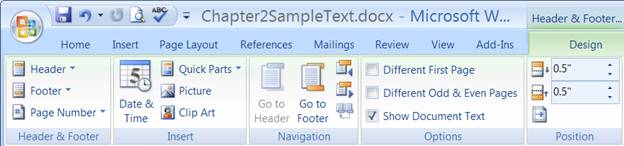
You are not limited to page numbers for your header and footer as you can put most anything in the space provided. The space for the header or footer can also be enlarged by typing the information and hitting the enter key. It will automatically adjust the header and footer space. A common style for research papers is to put your last name and the page number all right justified in the header and to suppress the header on the first page[8].
Notice the check boxes under the Headers and Footers Options group. Different Odd & Even enables you to put a different header/footer on the odd pages (1, 3, 5 etc.) then you have on the even pages (2, 4, 6 etc.). Notice this book. On the odd pages the page numbers are on the right side and the even pages they are on the left side.
Different First Page will give you a different header/footer on your first page which is common for a title page. Sometimes you may want your first page header/footer to be a larger font (i.e. newsletter) or different shading features or whatever (or possibly a different one).
Remember that a header/footer is a section formatting
feature so each section in your document can be set up differently. If you are
having trouble with your header/footers not changing like you think they
should, look to see if it is a section problem. One section problem may deal
with ![]() Link to
previous.
Link to previous will have this header/footer exactly the same as the section
before it. To turn this feature off, simply click the toolbar icon.
Link to
previous.
Link to previous will have this header/footer exactly the same as the section
before it. To turn this feature off, simply click the toolbar icon.
Print Layout View
 We have always been looking at our
document in what is called Print Layout
View.
Then we switched to Header and Footer view to see our headers and footers while
our text was grayed out. While we don’t often change the view it is a good idea
to know you can in case someone changed the view for you and you are wondering
why your document looks funny. Looking to the right side of the status bar you
should find the different View Buttons.
Click on each one to see what happens. Don’t worry; clicking back on Print
Layout will make your page look normal again. I rarely change views but sometimes
I will choose Draft view when looking for a problem. If Draft view helps me to
find the problem great, in any case I always go back to Print Layout.
We have always been looking at our
document in what is called Print Layout
View.
Then we switched to Header and Footer view to see our headers and footers while
our text was grayed out. While we don’t often change the view it is a good idea
to know you can in case someone changed the view for you and you are wondering
why your document looks funny. Looking to the right side of the status bar you
should find the different View Buttons.
Click on each one to see what happens. Don’t worry; clicking back on Print
Layout will make your page look normal again. I rarely change views but sometimes
I will choose Draft view when looking for a problem. If Draft view helps me to
find the problem great, in any case I always go back to Print Layout.
What’s wrong with this document
Looking at Figure 31 we can see that the typist word-wrapped to the second line but hit the tab key to create the hanging indent.

It looks okay but if we decided we want to change the font from Times New Roman to Arial look at the results in Figure 32!

The tab is still there only it is in the wrong place. Again if you are going to do a job you might as well do it right the first time instead of having to go back and fix it later.
One last example shown below, what is wrong with the following borders?
This looks harder than it really is. The second paragraph is not indented the same as the other ones. Check the paragraph indents for the third paragraph to see what they are on the ruler (as shown above). Then fix the second paragraph to match.