Chapter 3 Newsletters & Pamphlets

Contents
Chapter 3 Newsletters & Pamphlets
What’s
wrong with this document
Line Style
On the Home toolbar there is an option called Style.
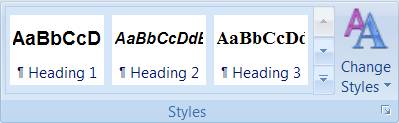
 If
you use the spinner you can see that along with Heading 1, Heading 2 and Heading
3 style there are several others. The highlighted style would be the style that
is in effect for the paragraph that you are on and in the beginning it would be
the Normal style. Every time you start a
new document the document will use what is called the Normal Style.
You can redefine the normal style so that when you create a new document you
will have the font, size and any other formatting features that you normally
like to use. It is not that hard to change the normal style, just follow these
simple steps:
If
you use the spinner you can see that along with Heading 1, Heading 2 and Heading
3 style there are several others. The highlighted style would be the style that
is in effect for the paragraph that you are on and in the beginning it would be
the Normal style. Every time you start a
new document the document will use what is called the Normal Style.
You can redefine the normal style so that when you create a new document you
will have the font, size and any other formatting features that you normally
like to use. It is not that hard to change the normal style, just follow these
simple steps:
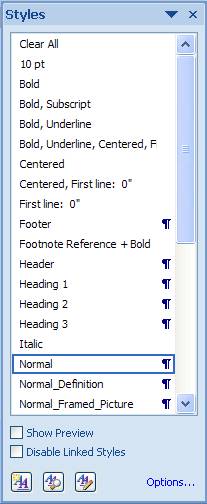
Click on Styles ![]() to get the Styles side menu as shown to the
right. There are lots of styles. Notice that the Normal is highlighted. Right
click on Normal to get a popup menu and choose modify (see next figure Modify
Style). You can see what options you have set and there are lots of shortcut
icons but notice the command button Format
at the bottom that will present you with a menu. Clicking on one menu
option gets you all the familiar dialog boxes for font, paragraph, tabs etc.
that we have been using.
to get the Styles side menu as shown to the
right. There are lots of styles. Notice that the Normal is highlighted. Right
click on Normal to get a popup menu and choose modify (see next figure Modify
Style). You can see what options you have set and there are lots of shortcut
icons but notice the command button Format
at the bottom that will present you with a menu. Clicking on one menu
option gets you all the familiar dialog boxes for font, paragraph, tabs etc.
that we have been using.
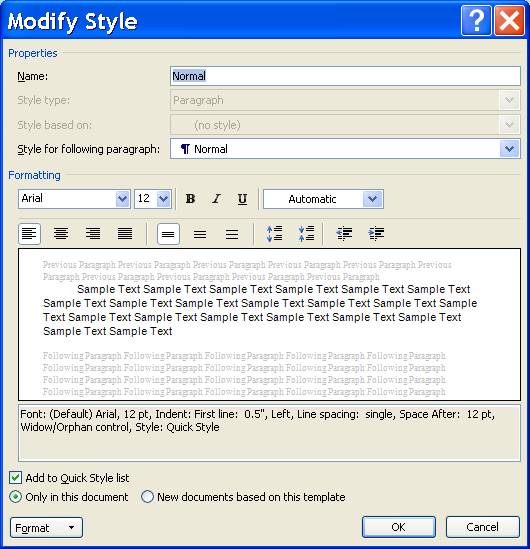
Set all your formatting features that you want. Before
choosing OK notice the option button: New
documents based on this template. Choose this and every time you create a new
document you will have these setting in place. You can also create your own
custom styles by clicking on the new style icon: ![]() .
This gives you the dialog box as Modify Style. Be sure to give your style an
appropriate name. I also recommend that you set the style based on: No Style. Style
is a very powerful formatting feature that you can use and you may want to
learn more about the power of this option.
.
This gives you the dialog box as Modify Style. Be sure to give your style an
appropriate name. I also recommend that you set the style based on: No Style. Style
is a very powerful formatting feature that you can use and you may want to
learn more about the power of this option.
There is a Style type that you may find useful and it is the
Heading 1 Style. When you are writing papers you
should break your paper with different headings for the various sections. For
example, this section I called Line Style
and the next section I called More on
Styles. Now, I formatted those paragraphs as a Heading 1 Style. To do this, highlight the heading line and then
change the Style from
After you have finished writing your paper, go to the
beginning of the document and put in a forced page break (Ctrl + Enter or ![]() breaks icon, Page Layout tab, Page Setup group).
This will give you a blank first page. Type in Table of Contents and center
this line. Give yourself a new paragraph and format this paragraph to left
aligned like as in Figure 3.
breaks icon, Page Layout tab, Page Setup group).
This will give you a blank first page. Type in Table of Contents and center
this line. Give yourself a new paragraph and format this paragraph to left
aligned like as in Figure 3.

 With
your cursor on the blank paragraph marker choose References Tab, Tables of contents icon.
There are several formats that you can choose from. Simply pick the one that
you like. You can see what the style will look like in the preview section of
the menu box. If you want more options choose the Insert Table of Contents … option. This feature will insert a Table
of Contents for you with all the heading 1 lines (and heading 2, 3 etc) and
their corresponding page numbers.
With
your cursor on the blank paragraph marker choose References Tab, Tables of contents icon.
There are several formats that you can choose from. Simply pick the one that
you like. You can see what the style will look like in the preview section of
the menu box. If you want more options choose the Insert Table of Contents … option. This feature will insert a Table
of Contents for you with all the heading 1 lines (and heading 2, 3 etc) and
their corresponding page numbers.
I find that I like to add a blank space before and after the tab leader. I simply place the cursor where I want the space and hit the space bar. You can also highlight the table and change the font and size if you desire.
More on Styles
To really utilize the word processor to its full advantage you should actually make all your formatting changes in the style dialog box. For example if you have separated your document with several Heading styles and you want to change the font size for all your paragraphs you cannot just highlight everything anymore. If you do you will change the font size for your headings as well.
When you start a new document and you want to use a different font, size or paragraph feature you should change the normal style, then start typing. This way if you want to change it later on all you have to do is to change the normal style again and apply this to the whole document (without having to highlight anything). If you have changed the font or size for a particular paragraph that paragraph will not change.
Defining your style.
To define your own style you choose Styles ![]() from the Home tab and you will get the Style menu. Click on the Add new
style button
from the Home tab and you will get the Style menu. Click on the Add new
style button ![]() to get the create new style dialog box (same
as modify actually)
to get the create new style dialog box (same
as modify actually)
Often times you will want to create a style that you will use often, but still keep the normal style. If you look at the previous chapters you will notice the terminology sections, all are a hanging indent paragraph format. I created this style and called in ‘Normal_Definition’. When I typed in those paragraphs I simply changed the normal style to Normal_Definition style so that they were always the same and I could change them all whenever I wanted to by simply changing the style the same way as described here in this chapter.
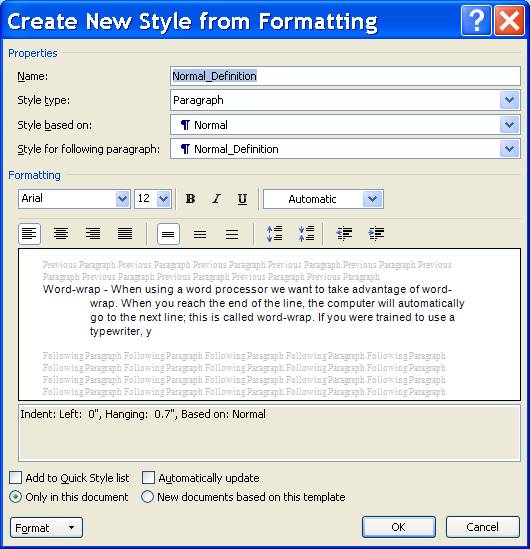
Notice that I have given my style a Name: which will show in the style drop-down list box when I am done. I then chose Format, Paragraph… and set my paragraph formatting features that I wanted to use for this style. You can see the description for the Normal_Definition that tells you that this style will be a hanging indent at 0.7”. Also be sure to Add to Quick Style list check box is turned on so that this style will be available to all your documents that you make.
Click on Format … so you can see that you can not only change the font and paragraph formatting features but you can also set your Tabs, Borders, Language, Frame and Numbering as well.
I accomplish all of my formatting in one step by setting the style for that paragraph. It saves me time since I do not have to go into three or four different menus setting for each one. Play around with styles for a little while to get a better a feel of how they work. Styles are extremely powerful word processing tool.
Columns
 You have been working with Columns all
along and I bet you did not even realize it! Of course you have been working
with only one column. We can create documents with more than one column. When
the text gets to the bottom of the first column it wraps to the top of the next
column. You can create a newsletter using a multiple column format. We are
going to talk about using two columns; however working with more columns is
pretty much the same. Let’s start by choosing
You have been working with Columns all
along and I bet you did not even realize it! Of course you have been working
with only one column. We can create documents with more than one column. When
the text gets to the bottom of the first column it wraps to the top of the next
column. You can create a newsletter using a multiple column format. We are
going to talk about using two columns; however working with more columns is
pretty much the same. Let’s start by choosing ![]() found in the Page Setup Group under the Page
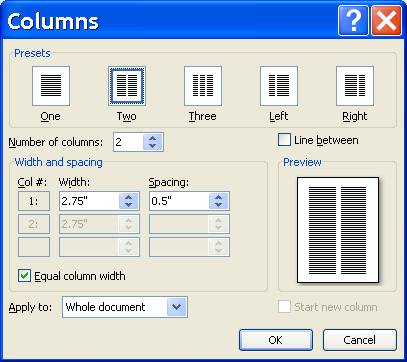
Layout Tab. I just chose 2 columns from the list but let’s look at the More Columns dialog box.
found in the Page Setup Group under the Page
Layout Tab. I just chose 2 columns from the list but let’s look at the More Columns dialog box.
Let’s use two columns and you can either click on the Two column preset or choose the number of columns to be 2. As long as the Equal Column Width check box is checked, our columns will be the same size (this is what we want for now). It is easy to change the width of each column by turning this check box off and manually setting the width. You can also manually adjust the spacing this way as well.
In this case you want to Apply to: the Whole document. Let’s go ahead and choose OK. Depending on which view you are in determines how your screen is going to look. If you are in “Draft” view you will have only one column in appearance. If you are in “Page Layout” view you will have two columns in appearance. In either case your ruler will look something like this.
![]()
Your ruler is divided showing you the size for each column as well as the space between the two columns. In normal view you will not know where the top of the second column begins; you will see the normal dotted line separating pages. In “Page Layout” view your text will wrap to the top of the 2nd column and you can easily see it.
Everything works the same as it did before; you just have two columns on your paper. If you want to create a brochure you do have to be careful in your layout because of what happens when you fold the paper. If your printer is capable of printing duplex you can print this out on one piece of paper. If not, simply use the photo-copy machine to get your printout on one piece of paper by copying the second page onto the first page.
 Let’s
look at Figure 7. Here you can see that the first column of the flyer is
actually the last column of your document[1].
When you lay out your flyer you will have to be aware of this fact and be sure
to check in print preview before you print to make sure that everything is
still in the correct position. A simple change can mess up your layout so you
just need to check.
Let’s
look at Figure 7. Here you can see that the first column of the flyer is
actually the last column of your document[1].
When you lay out your flyer you will have to be aware of this fact and be sure
to check in print preview before you print to make sure that everything is
still in the correct position. A simple change can mess up your layout so you
just need to check.
Landscape Printing
 Since
your columns become narrow you may want to switch your paper’s orientation
around so that it prints sideways or what is properly called Landscape mode. We have up to this time
always printed in Portrait mode, which gives us a standard
paper size of 8 ½ x 11. In landscape mode we have 11 x 8 ½. These are shown in
Figure 8.
Since
your columns become narrow you may want to switch your paper’s orientation
around so that it prints sideways or what is properly called Landscape mode. We have up to this time
always printed in Portrait mode, which gives us a standard
paper size of 8 ½ x 11. In landscape mode we have 11 x 8 ½. These are shown in
Figure 8.
In order to change the mode that we are printing in you need
to choose ![]() icon from the Page Setup Group
in the Page Layout Tab. Take a look
in print preview at your document. Your columns will automatically adjust to
the wider paper, keeping the same proportions that you had before. As long as
you followed the basics of word processing your document should ‘look’ the way
you want it to.
icon from the Page Setup Group
in the Page Layout Tab. Take a look
in print preview at your document. Your columns will automatically adjust to
the wider paper, keeping the same proportions that you had before. As long as
you followed the basics of word processing your document should ‘look’ the way
you want it to.
You can do Duplex Printing if your printer is capable of it. You need to choose File, Print… (You do not have to print, only look at the options, ESC key) to get the Print dialog box as shown in Figure 10. Notice the Properties command button.
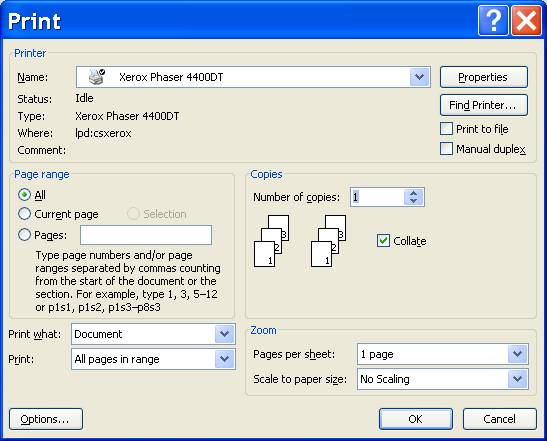
Click the Properties command button so that we can make changes to our printer setup.
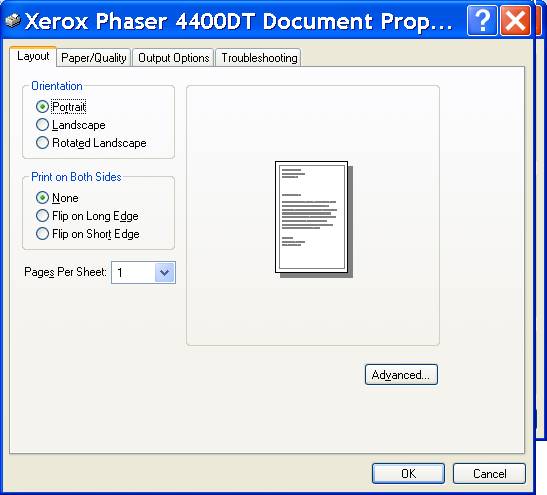
Looking at the Print on both Sides Radio button group we can choose none (for single page printing) or long or short edge duplex printing.
Long Edge is how I printed this book, with a binding on the long edge. Short Edge is for a book with the binding on the top and you flip the pages up. You may want to print only two pages at first to make sure you have it right. Remember that this will be in effect for your other applications as well.
Sections
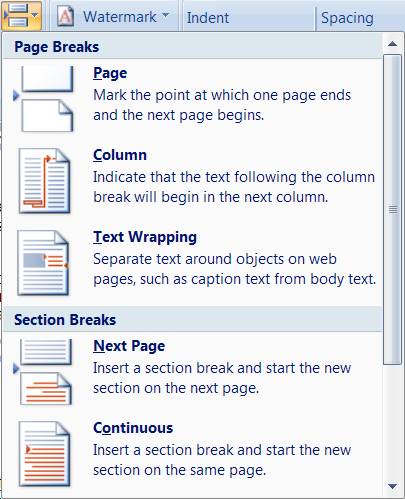
There are times when you want to end a column and start a
new one before the text automatically word wraps. You can do this by inserting
a column break. Simply choose ![]() Insert Page
and Sections Breaks and then click the option for the Column break.
Again, when forcing these breaks (we discussed line breaks and page breaks),
you have to be careful when you revise your document as the break may suddenly
be in the wrong place. You will be able to see the column break in your
document as a dotted line with Column
Break written in the middle[2].
Insert Page
and Sections Breaks and then click the option for the Column break.
Again, when forcing these breaks (we discussed line breaks and page breaks),
you have to be careful when you revise your document as the break may suddenly
be in the wrong place. You will be able to see the column break in your
document as a dotted line with Column
Break written in the middle[2].
 If
you need to have two columns in one place, one column in another place and
maybe three columns someplace else you will need to put in a section break.
Section Breaks allow you to change the Line Numbering, Columns and Headers
& Footers for that section (section formatting features). Each section can
be formatted differently. Unless you put in section breaks the computer treats
the whole document as one section. Often times “Draft” view is the easiest way
to view exactly where you have the section breaks.
If
you need to have two columns in one place, one column in another place and
maybe three columns someplace else you will need to put in a section break.
Section Breaks allow you to change the Line Numbering, Columns and Headers
& Footers for that section (section formatting features). Each section can
be formatted differently. Unless you put in section breaks the computer treats
the whole document as one section. Often times “Draft” view is the easiest way
to view exactly where you have the section breaks.
To insert a section break, simply place the cursor at the beginning of where you want the break to go; i.e. where you want the number of columns to change and choose the break that you want.
There are two kinds of section breaks that you can put in. A Next page break and a continuous break. A next page break will start the next section on a new page. A continuous break will start the new section on the same page.
If you are having trouble with your section breaks, choose Draft View, as it is easier to see exactly where your breaks occur. One of the big problems with section breaks is having too many! In normal view you will see where the section ends as shown in Figure 13. In this case I have three section breaks; one right after the other. Simply highlight the extra breaks and delete them. It will help if you know how many breaks you want. If you want a section with two columns and a section with one column, then you will need one break between them.
 Shading
A neat feature is the use of color and shading. Here is a paragraph that I have formatted as shaded. I have chosen a pattern of 25%. If I chose a higher % the shade would be darker (the dots would be closer together).
To produce the shaded effect, select the paragraph and
choose ![]() Shading Icon and then pick the color
you are interested in. That is all there is to it.
Shading Icon and then pick the color
you are interested in. That is all there is to it.
Shading works just like borders in that if you do not want the shading to go all the way across the page you will need to adjust your indents. Below I have set my right indent to 3” to produce a half-shaded paragraph.
You can have text inside the shaded area but remember the end of the shade is at your right indent, so any more text will simply wrap to the next line. Generally speaking you should make your text bold so that it stands out better against the shaded background as shown below.
Text inside Bold, not bold
If you have a color printer you can have your shading in a various number of colors, simply choose the one that you want. You can actually always choose a color so it looks cool on the computer screen. It will just print out in shades of gray on a regular printer.
Color
Since I have just introduced color to you, I thought I would mention that you can actually color most anything. You can set the color for your borders and your text in about the same manner. In fact, if you have a dark color pattern you should offset your text as a white color. We have always used the auto setting for color, but feel free to experiment. There are some general rules about color that you should be aware of.
1. Limit the number of colors you are using to about 6 different ones[3].
2. Be sure that any text you have contrasts highly to your background color so that you can easily read it. Black text on a dark background does not work very well. Some colors mix better than others, like white text on a blue background. Choose carefully.
3. Don’t over do it. A little color makes a paper look great; an overdone paper does not look so well. Use your judgment, if you have no judgment ask a friend’s opinion.
4. Remember that looks only make an already good paper look better and that content is more important than just making something look good.
Inserting Clip-art
 If
you are going to create a newsletter or flyer you would probably want to add some
kind of graphics to help spice it up. You can actually scan a photograph into
the computer if you have access to a scanner. You would then save this file as
a bitmap image[4]
on your disk. You can then insert this as a picture into your document. If you
do not have access to scan your own pictures you can also draw your own
pictures with a drawing program like “Paintbrush”. If you cannot draw, luckily
there are several Clip-art (pre-drawn
pictures) pictures that you can choose from, to insert into your document.
If
you are going to create a newsletter or flyer you would probably want to add some
kind of graphics to help spice it up. You can actually scan a photograph into
the computer if you have access to a scanner. You would then save this file as
a bitmap image[4]
on your disk. You can then insert this as a picture into your document. If you
do not have access to scan your own pictures you can also draw your own
pictures with a drawing program like “Paintbrush”. If you cannot draw, luckily
there are several Clip-art (pre-drawn
pictures) pictures that you can choose from, to insert into your document.
 Let’s learn
how to insert a clip-art picture. The tulips Figure 15 are a sample of a
clip-art picture that I just inserted. Start by placing the cursor at the
beginning of the paragraph where you want the picture to go (may not be
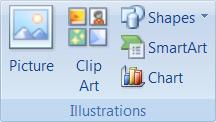
required but I find it works better), Choose the Insert tab, and look for the Illustrations
Group. If you choose Clipart it will
open the Clip-art Gallery Side menu that breaks down the pictures into
categories (the default is all). Search is a nice way to narrow the scope. When
you find a picture that you like you just click on it to insert it. This will
place the picture in the document for you. Sounds easy? It is.
Let’s learn
how to insert a clip-art picture. The tulips Figure 15 are a sample of a
clip-art picture that I just inserted. Start by placing the cursor at the
beginning of the paragraph where you want the picture to go (may not be
required but I find it works better), Choose the Insert tab, and look for the Illustrations
Group. If you choose Clipart it will
open the Clip-art Gallery Side menu that breaks down the pictures into
categories (the default is all). Search is a nice way to narrow the scope. When
you find a picture that you like you just click on it to insert it. This will
place the picture in the document for you. Sounds easy? It is.
Sometimes the picture you have chosen is very large; the
tulips were actually 4” high! That is a little too big, but never fear, as it
is very easy to fix. Single click the picture and you should then see little
square boxes around the edge Figure 17; these are called resize handles.
You can change the size of the picture by using a click and drag motion with
these handles. If you drag the corner handles it will keep the same proportions. The inner squares
will stretch or shrink out of proportion. When you see the resize handles it
also means that 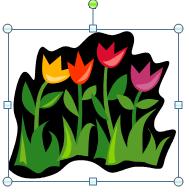 the
picture is selected (highlighted).
the
picture is selected (highlighted).
Another way to resize a picture is not by using the resize handles but by using the Picture dialog box. Right click the picture and choose Format, Picture... and look for the tab Size. You can either change the size by being specific or you can change the size by scaling.
Now you may wonder why your text is not wrapping around your
clip-art picture like it does in the book here. If you want to wrap the text
around the picture you need to choose ![]() from the Page
Layout Tab, Arrange Group. If you choose square then the text wraps around
the outside of the image. If you choose tight and the image has a background
color then the text will go over top of the background image. Play around with
the options and see what they do. Don’t be surprised if your picture ‘jumps’
around a little.
from the Page
Layout Tab, Arrange Group. If you choose square then the text wraps around
the outside of the image. If you choose tight and the image has a background
color then the text will go over top of the background image. Play around with
the options and see what they do. Don’t be surprised if your picture ‘jumps’
around a little.
When you are in “Page Layout” view you can move your picture to any location that you want. Simply use a click and drag motion to place the picture in the correct location on the page. I also can use the arrow keys to nudge the image a little which works better than a mouse sometimes. As always, to learn a little bit more choose Help and read what it has to say. Pictures and frames are neat but can also be a pain in the neck sometimes. After you play with them for a while you will see what I mean.
If you have a picture that you have drawn in Paintbrush[5], that picture is saved as a bitmap image (the extension will be .bmp). You can insert this picture almost the same as you would clip-art. The only difference is that you choose Picture, from the Illustrations Group, and then choose the filename for your picture. You will need to know what drive and directory the file is saved in. This will insert the file as a picture in your document. Sizing the picture and wrapping the text are the same as for clip-art pictures. You can also insert a picture that you have scanned into the computer as well.
Copying
There are times when you have written something in one document and you wish to copy that information to the document you are currently working on. This can be done very easily. Up until now we have had only one document open at any one time. You can have many documents open at once depending on how much memory space your computer has. I often have two or three documents open at the same time. To copy the information from one document to another simply follow these simple steps:
1. Open both documents.
2. Choose the document that has the information you want to copy (Source Document). If it is not currently on your screen, look on the Task Bar and click on it. This will make that file the active one. Alternatively you can click on the View Tab, Window Group, Switch Windows and choose the file name.
3. Highlight
the information that you want to copy and choose Copy ![]() .
.
4. ![]() Now make the Destination Document the
Active document.
Now make the Destination Document the
Active document.
5. Place the cursor at the location that you want the information to be and choose Paste .
Now you should save your destination file and if you are done with the source file you should close it. You can have many documents open but keep in mind that the more files you have open, the slower your computer is going to run.
If you just want to look at two different files at the same time you can simply choose View Tab, Window Group, Arrange all. This will tile the windows on your screen so that you can look at both of them. It is easy to move from one document to the other by simply clicking with your mouse on the window you want to go to. If you get tired of looking at both just click on the maximize arrow for the document you want to look at. You can also resize the two windows as you would resize any window.
Split
Sometimes you may want to look at two parts of the same file. This is similar to looking at two files but instead of arranging your windows you can split your screen. Choose View Tab, Window Group, Split. This will turn your mouse pointer to a gray line that you can move to the size of the split that you want). Click when you have it the way you want it. Each window will have its own scroll bar so you can scroll them independently.
To get rid of the split simply choose Remove Split. Again you should try this a few times to become comfortable in doing this.
What’s wrong with this document
Looking at the picture below, can you see what is wrong?
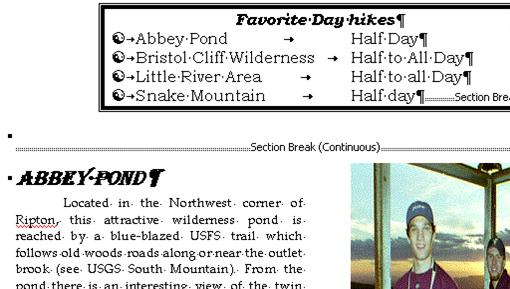
Notice the second section break is causing extra space between the two sections. You need to delete one of the section breaks. Keep in mind that when you delete one of the section breaks you may have to redo your section formatting features.
Most of the other mistakes that you can make I have already spoken about. If you are having trouble, read over the section again that talks about what you are trying to do. The biggest error will most likely be in the column and section breaks. The best way to fix them is to go into “Draft” view and look to see if you have too many and to delete any extra breaks. Oh yeah, the other main problem is trying to get your picture in the exact spot that you want it. Just give it your best shot.