Chapter 7 Access Tables / Queries
Contents
Chapter 7 Access Tables / Queries
Creating a Sort Query with
Formulas
Creating a Query with
equal type criteria
Creating a Query with
< or > type criteria
What’s Wrong With This
Database
Database Basics
Have you ever used a database before? I bet you have. Maybe not a computerized database but a manual database, I am sure you have used. The best example of a database that I can give you is that of a phone book! A phone book is a collection of peoples’ telephone numbers and address.
I want you to note that we will cover database in only 2 chapters but there is a TON more to learn. Let us start with some of the terminology:
Database - is a file that stores information in a structured and organized manner that allows you to retrieve that information in several different ways (i.e. forms, queries & reports). A database file holds tables, forms, queries, and reports all in one file as pictured in Figure 1.

Tables - hold the structure of your information and is comprised of records. An easy way to picture a data table is to think of a spreadsheet with columns and rows. The row would be the records and the columns would be the fields. Each data table relates to one entity. For example a data table about a phone book, the entity would be the people, since that is what is in the table.
Record - is information about one particular entity. A record in a phone book would include the person’s last name, first name, address, and phone number. Each person or entity has its own record. Everything in the record pertains to that entity.
Fields - make up the individual components of the record. In the phone book example last name is a field, first name is a field, address is a field and so is phone number. Each field has a type, i.e. Number or text. Each field also has a specific size, i.e. 10 letters.
Primary key - is a field that uniquely identifies a record. Can you think of a number that uniquely identifies you? Try your social security number. Some other examples of primary keys are customer number, product number, invoice number, and billing number. Often times the primary key is automatically assigned by the computer.
DataSheet - is a way to look at the information in your data table. Datasheet view is laid out like a spreadsheet with columns and rows. You see as many records and fields on your screen as will fit.
Queries - enable you to pull out the information from your data table that you want to look at. They enable you to narrow down the focus, and only see the records and fields that meet a certain criteria. Queries are based on a table or another query.
Forms - are just another way to look at the information in your data table. With a form you see only one record at a time and generally you try to fit all the fields on one screen. Forms are generally made to look like the paper form that you may be familiar with. Forms can be based on a table or a query.
|
Database Basics 1. Keep it simple. 2. Never have a Calculated field in your Table. 3. You should have a Primary Key to uniquely identify each record in your Table. 4. Do not store a Field in another Table unless it is a Primary Key used to connect the two Tables. 5. Forms and Reports can be created using a table or query. Figure 2 |
Reports - are designed to print information in your data table. Reports can be based on a table or a query. The phone book is really a report that was printed from the information in the phone companies’ table.
Let’s go over the Basics as shown in Figure 2. A database can become infinitely complicated and you need to try and keep it as simple as you can (tough in a complex world). Since a database can get complicated you need to make sure that your design is as simple and straightforward as you can get it.
If the information you want to have can be calculated then you should include a formula in a query and not type in the result (i.e. your gpa can be calculated so you would use a formula in a query and not save the actual value in a field in your table). The slowest thing a computer does is retrieve information from a disk (hard drive or floppy) and the fastest thing a computer does is to perform calculations so you let the computer do what it is best at.
As talked about above each record should a unique identifier, your social security number works nicely. However often times you can use a number that is automatically generated and that works fine. That way you never have to worry about typing it in as the computer handles it for you.
Basic number 4 really does not relate to what we cover in this class as we only create a one table (flat) database system. However it is important enough to include so I have. When you have more than one table in a database system you should never have the same field in more than one table UNLESS it is the primary key used to identify a record. In this case you would call the key the foreign key (naming example: fkCustomerID) and it is used to connect two tables together. This does go beyond the scope of what I want to teach you at this time.
Lastly with basic number five and just want to point out the fact that not only can you base forms and reports on queries and that this is very common.
Let’s talk about data tables first since they hold the foundation or structure of your database system. Everything in your database is based on the information contained in your data table(s). In the case of a phone book the structure is pretty much the same for all phone books. Can you guess what it is? Your phone book will be organized pretty much the same as everyone else’s with the names sorted alphabetically by last name, first name. The address is always below the name and the phone number is to the right. The structure of a database would be how many characters are allowed for each field and is the information, text or number data type. A phone number’s structure is always the same, three numbers then four numbers.
|
Field |
Type |
Size |
|
fldLastName |
Text |
15 |
|
fldFirstName |
Text |
10 |
|
fldAddress |
Text |
20 |
|
fldCity |
Text |
20 |
|
fldState |
Text |
2 |
|
fldZipcode |
Text |
10 |
|
fldPhoneNumber |
Text |
14 |
|
fldHeight_ft |
Number |
Integer |
|
fldHeight_inches |
Numbers |
Integer |
|
fldWeight |
Numbers |
Integer |
|
fldInsurance |
Y or N (yes/no) |
1 |
|
fldBackpack |
Y or N |
1 |
|
fldCanoe |
Y or N |
1 |
|
fldKayak |
Y or N |
1 |
|
fldSnowshoes |
Y or N |
1 |
|
fldMailOrder |
Y or N |
1 |
|
|
Figure 4 |
|
 The
easiest way to begin to understand a database is to look at how other people
build theirs. One way to do this is to look at a warranty card or information
card that you fill out. Let’s take a look at a sample Wilderness Vermont
Information Card Figure 3. You can see what the Wilderness Vermont
database looks like by just looking at the information that is being asked for.
This warranty card makes up one record in the Wilderness Vermont database. Each
piece of information would be a field. Let’s identify the different fields that we can see. There may be fields in the
database that we do not see but we can get a good picture of the database by
looking at this information card. The information card would be the INPUT for the database. To get a complete picture of
the database we would need to see the OUTPUT as well. We can see not only the fields but
the size of the fields as well. We will have to guess whether the field is text or a number. Figure 4 is the list of
fields I can see from the information card.
The
easiest way to begin to understand a database is to look at how other people
build theirs. One way to do this is to look at a warranty card or information
card that you fill out. Let’s take a look at a sample Wilderness Vermont
Information Card Figure 3. You can see what the Wilderness Vermont
database looks like by just looking at the information that is being asked for.
This warranty card makes up one record in the Wilderness Vermont database. Each
piece of information would be a field. Let’s identify the different fields that we can see. There may be fields in the
database that we do not see but we can get a good picture of the database by
looking at this information card. The information card would be the INPUT for the database. To get a complete picture of
the database we would need to see the OUTPUT as well. We can see not only the fields but
the size of the fields as well. We will have to guess whether the field is text or a number. Figure 4 is the list of
fields I can see from the information card.
I used a field type of text and numbers for most of the fields. Phone number and zip code are considered text only because of the way we are going to format them. Since we are not using them for any calculations they can be considered text. However the last 6 fields I used a new field type and that was Yes or No, which is often used for 'question like fields'. This is all we can tell about their Database file by looking at the Information Card. Notice that I preceded each field name with fld. This is a naming convention, meaning you do not have to do it but that it is a good idea. You should notice that I did not use any blank spaces but capitalized each word and in some cases the _ character to separate them. This is also a convention that you do not have to do but in reality will make it a lot easier for more advance topics so you might as well learn them now.
 A text data type you need to figure how many
letters you want to allow for that field and in the Wilderness Vermont example
all you have to do is count the little boxes. A number data type you need to
figure out what type of number you want to use. An integer data type is for
whole numbers only that fall into the range of -32,768 to 32,767. So a number
33,000 would not fit into an integer data type field and would cause an error.
In the Wilderness Vermont the numbers will all be small so I made them all
integers. You can see in figure 5 some of the other data types and the values
that can be placed in them. You always try to use the smallest (number of
bytes) data type that you can.
A text data type you need to figure how many
letters you want to allow for that field and in the Wilderness Vermont example
all you have to do is count the little boxes. A number data type you need to
figure out what type of number you want to use. An integer data type is for
whole numbers only that fall into the range of -32,768 to 32,767. So a number
33,000 would not fit into an integer data type field and would cause an error.
In the Wilderness Vermont the numbers will all be small so I made them all
integers. You can see in figure 5 some of the other data types and the values
that can be placed in them. You always try to use the smallest (number of
bytes) data type that you can.
To really study someone’s database system you would need not only the INPUT but also the OUTPUT that comes from the database. Combining the two you can figure out which database fields that the company has in its database. Since a computer accepts input and processes it in some way to produce output by looking at these two you can construct the database. If you input a field it should be used in some way either as a processing step or directly as output. If the input is not used in any way it may not be worth saving in a database file.
When thinking of database files think of a large amount of
data and more than one table (for simplicity we are only going to use one table
and only a few records). The record above for Wilderness
Designing a database
The first step in designing a database begins on paper! It seems as if a lot of this computer stuff we must do by hand first. This is done as a way to organize your thoughts. You need to identify all the fields that you will need in your table. This can be done by looking at the forms and reports that your database system will need (just like we did above or by designing your reports and forms). In other words, ask yourself:
|
Field |
Type |
Size |
|
pkFriendID |
AutoNumber |
Long |
|
fldLastName |
Text |
15 |
|
fldFirstName |
Text |
10 |
|
fldAddress |
Text |
20 |
|
fldCity |
Text |
20 |
|
fldState |
Text |
2 |
|
fldZipcode |
Text |
10 |
|
fldPhoneNumber |
Text |
14 |
|
fldBirthday |
Number |
Date/Time |
|
fldSpouse |
Text |
15 |
|
fldChildren |
Text |
50 |
|
fldComments |
Memo |
|
|
fldCurrent |
Y or N (yes/no) |
1 |
|
fldHolidayList |
Y or N |
1 |
|
fldFastList |
Y or N |
1 |
|
fldKayak |
Y or N |
1 |
|
fldSnowshoer |
Y or N |
1 |
|
fldHiker |
Y or N |
1 |
|
|
Figure 6 |
|
1. What information do I want to get out of this database?
2. What information do I need to put in this database to get the information that I want?
For example, if I want a list of all the people who own a kayak I will need a field that first tells me if they have a kayak (fldKayak) and I will need their names as well.
I want to create a simple phone book Data table for myself using the fields listed in
Figure 6. Let’s start Microsoft Access. You should know all the parts of
the window by now. I will however talk about the tool bar buttons as we need
to. Some of them you will already know. Once you have Access opened, click on Blank Database. You should notice on the right side has changed so you can create
(save) your database. When creating a database you have to save it first! Call
this file  PhoneBook. Since I always have you save
before you begin, this should come as no surprise. Actually you will find when
working with a database that you have to save first and save often. Also note
that this is THE ONLY TIME YOU CAN SPECIFY THE DRIVE, FOLDER AND FILENAME.
There is NO save as option in the
database that allows you to save the FILE to another location.
PhoneBook. Since I always have you save
before you begin, this should come as no surprise. Actually you will find when
working with a database that you have to save first and save often. Also note
that this is THE ONLY TIME YOU CAN SPECIFY THE DRIVE, FOLDER AND FILENAME.
There is NO save as option in the
database that allows you to save the FILE to another location.
Your screen should look like the figure shown below. Access will have many tabs like the spreadsheet but they do not have to all be open.
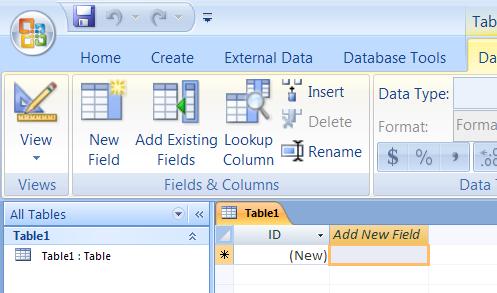
On the left side you see that it shows you all the tables that you have. As you create queries forms and reports the left side is where you will find them.
 Creating a Table
A data table is the structure that is going to hold all of your information. Figure 6 above shows you all the fields that I wanted in my table. Since we just started this data base Access already has started to create a table. If for some reason you closed it you can always choose the Create Tab, Table icon, found in the Tables Group. I find it easiest to create your table in Design View so that is what we are going to do by choosing Design View icon located on the Table Tools Data Sheet Tab.
|
Naming Conventions tbl - Tables qry - Queries frm - Forms rpt - Reports lbl - Labels txt - Text Boxes Figure 11 |
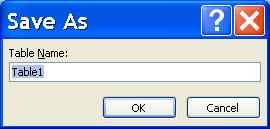 Hmm, this pops up asking me to save the
table even though I haven’t really done anything yet. This is the nature of
databases’ to save often. We have saved our database but not our table, so we
must do so now. Name this table tblFriends. We are going to use the three
letter prefix naming convention as shown to the right in Figure 11. When you
save a table, query, form or anything else, they will all be saved within your
database file. In this case PhoneBook.accdb is a file that will have our data
table in it. You will never actually save your database again, however you will
always have to save your data table and forms as you make changes to them.
Hmm, this pops up asking me to save the
table even though I haven’t really done anything yet. This is the nature of
databases’ to save often. We have saved our database but not our table, so we
must do so now. Name this table tblFriends. We are going to use the three
letter prefix naming convention as shown to the right in Figure 11. When you
save a table, query, form or anything else, they will all be saved within your
database file. In this case PhoneBook.accdb is a file that will have our data
table in it. You will never actually save your database again, however you will
always have to save your data table and forms as you make changes to them.
Now you will get you a blank table design grid (similar to Figure 9) that has columns for the field name, data type and description. In the lower right corner there are directions for the place that your cursor is on.
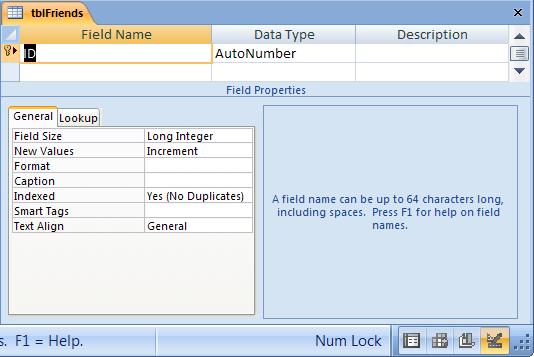
 The first field is done for you (you can
delete it if you want) but lets continue to use a naming convention and change
the name from ID to pkFriendID. pk stands for Primary Key, Friend is the name
of our table and ID is what this field is. The Autonumber data type is what we
want (hit F1 to review the help on data types). Notice in the Field Properties
that field size is set to long integer by default (we don’t need to do
anything). For a description I put in “Automatically chosen by the computer” to
explain what this field is all about. This description is a nice way to remind
yourself what you were thinking when you created the data table as well as a
great help tip to people using the database because it will also display as the
status bar text.
The first field is done for you (you can
delete it if you want) but lets continue to use a naming convention and change
the name from ID to pkFriendID. pk stands for Primary Key, Friend is the name
of our table and ID is what this field is. The Autonumber data type is what we
want (hit F1 to review the help on data types). Notice in the Field Properties
that field size is set to long integer by default (we don’t need to do
anything). For a description I put in “Automatically chosen by the computer” to
explain what this field is all about. This description is a nice way to remind
yourself what you were thinking when you created the data table as well as a
great help tip to people using the database because it will also display as the
status bar text.
This field has already been set as the primary key so we do not need to do that but if you did just click on the primary key icon. You can have more than one field as the primary key and in that case you would select one or more fields and then click on the primary key icon making the combination of fields the primary key.
Basically you continue doing the same thing for the rest of the fields.
1. Typing in the name of the field
2. Choosing the Data Type for the field and setting the Field Properties
3. Typing in a description or help text for the field.
The Field properties will change depending on the data type that you have chosen. So Type in the fldLastName and set the data type to text and take a peek at the field properties.
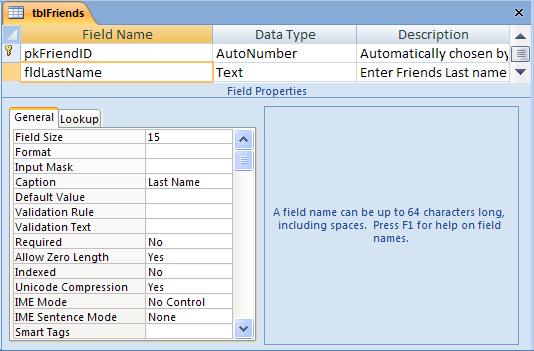
Notice two things specifically, one I set the field size to 15 and I add a Caption “Last Name”. The caption will be used later on. When you put in a caption it will display “Last Name” instead of fldLastName so it is a personal preference look. So when you type the caption you don’t use the naming conventions (fld prefix and we do use blank spaces). You should notice the lower right corner text keeps changing as you move from one field property to the next, it keeps providing you with a little help. There is a lot on this screen that we have not talked about and that is because we are just going to skim the surface of databases. You can however get more information anytime by pressing F1 for help.
Go ahead and do the same thing for fldFirstName, fldAddress, fldCity and fdlState as they are all text. The caption will be the field name without the prefix and with spaces if needed. Make up descriptions for each one or refer to the figure below.
ADD picture of all descriptions
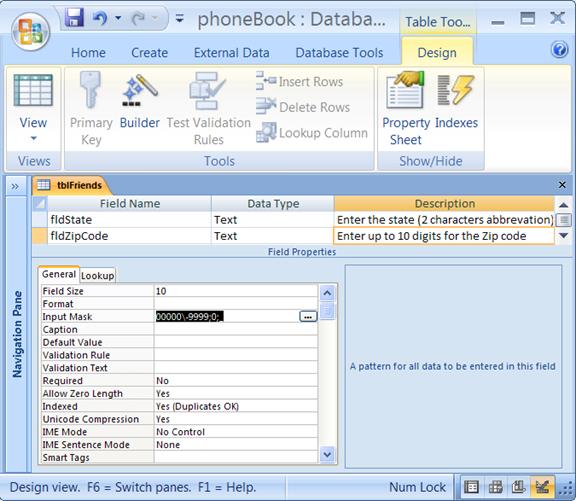
 For fldState I want to add a format.
When you type in the two letter abbreviation it really should be capitalized. We
can force this to happen by putting in a > sign in the format row (<
would cause to be lowercase). No matter what gets typed into this field it will
be automatically changed to all caps. How did I know this? Well on the right is
says to press F1 for help with the formatting options, so I did. That is where
I find out about the greater than sign and what it does.
For fldState I want to add a format.
When you type in the two letter abbreviation it really should be capitalized. We
can force this to happen by putting in a > sign in the format row (<
would cause to be lowercase). No matter what gets typed into this field it will
be automatically changed to all caps. How did I know this? Well on the right is
says to press F1 for help with the formatting options, so I did. That is where
I find out about the greater than sign and what it does.
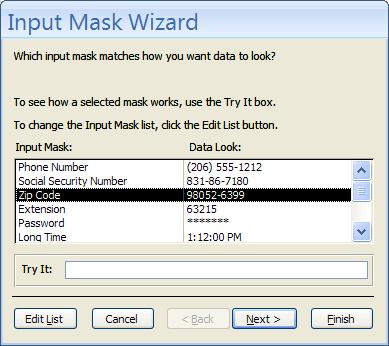
When you get to fldZipCode even though it is a number, it is not used for calculations, therefore let’s choose text as the data type. Set the size to 10 to take advantage of the extended zip code (even though the Wilderness Vermont form has not been updated yet). Click on the Input Mask and you should notice the ellipses instead of a drop down arrow this time. Go ahead and click on the ellipses to get the dialog box shown.
Ha, When you click on the ellipses the computer will not let you continue unless we save first! See you should save often and the database makes you save often. After saving you can use the input mask wizard to specify the format for this data. I just chose next accepting it the way it was. When you get to the option buttons be sure to SAVE WITH SYMBOLS. After you are complete you will notice a bunch of numbers, semi colons, etc. placed in the input mask property and these are the codes that MS Access needs. There are several different types of input masks that you can choose. An input mask is simply a format for the data that will go in this field. In the case of a zip code, we will type in the number and the hyphen will show up automatically.
Your screen should look something like this.
Go ahead and do phone number with an input mask as well. Remember to choose SAVE WITH SYMBOLS. For the Birthday field you need to change the Type to Date/Time. I would recommend a format of short date (m/d/yy). The fields to hold the spouse’s name and the children’s name are both text fields. The comment field on the other hand I used a data type of memo. A memo data type allows to hold a really lot if text data (up to 63,999 characters) in a field (a text field allows 255 characters). Use the memo data type sparingly as allowing you to use to save a lot of text in one filed also takes up a lot of space.
Now you will start the yes/no question fields, starting with fldCurrent. These fields are all yes/no data type and will be used in the next chapter to perform queries. You should also set the default value for these questions. For fldCurrent I am going to set the default value to yes by putting in a number 1, zero means no. You need to think about what the most common choice would be, yes or no and then set the default that way. A default value will automatically be placed in this field until we change it. You may have noticed that the default value for our number fields was 0. A Yes value will put a check in a check box when we make our form.
If you click on the Lookup tab in the Field Properties for fldCurrent you will see the display control is a check box. If you have looked before text fields all have a text box. Since a yes/no data type can only have 2 possible answers a check box is used for this data type. Blank means no, a check means yes.
Finish off creating your data table with the rest of the yes/no question fields. When you are finished, your completed design grid should look like this.
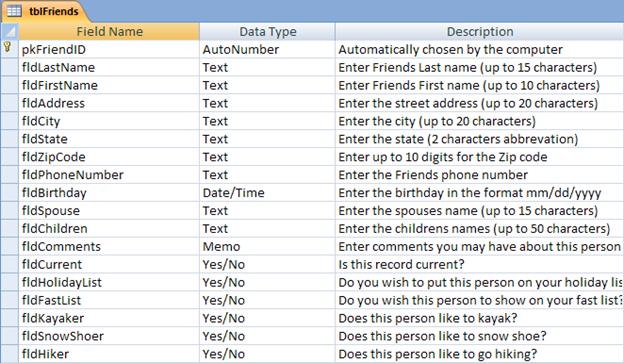
 Our data table is all ready to start
typing in information i.e. enter in records. Notice the Design View icon is not
there but instead you have the Datasheet
View icon. Just click this to go to datasheet view where you can start
typing in your records. Notice the column headings match your caption property.
Also notice the status bar text matches your description property. If you typed
in any default values then they would also show up as well as part of a new
record. IF you have not saved your design yet when you click datasheet view you
will be asked to save first.
Our data table is all ready to start
typing in information i.e. enter in records. Notice the Design View icon is not
there but instead you have the Datasheet
View icon. Just click this to go to datasheet view where you can start
typing in your records. Notice the column headings match your caption property.
Also notice the status bar text matches your description property. If you typed
in any default values then they would also show up as well as part of a new
record. IF you have not saved your design yet when you click datasheet view you
will be asked to save first.
In datasheet view you can type in
your information for your records. You can see how this looks similar to a
spreadsheet. Simply hit the tab (or enter) key to go to the Last name field and
type in your last name. Tab to first name and type in your first name. When you
are at the last field hit the tab key and you will go to the next record. When
you move to the next record Access will automatically save the record to your
file. In Access you save your database file once, when you first create it.
After that you save all the tables, queries, forms and reports as you make
them. When you enter information into your data table the information gets
saved on a record-to-record basis. You do not have to do anything to save a
record except move to the next record. As you are typing in the record you
should notice the pencil icon ![]() on the left of the record. Once the pencil is
gone the record is saved. This means the record has not been saved. Notice that
ID was automatically filled in. Notice the status bar where it says record 1 of
10. This means we are currently on record 1. The * at the bottom is where you
would type in a new record.
on the left of the record. Once the pencil is
gone the record is saved. This means the record has not been saved. Notice that
ID was automatically filled in. Notice the status bar where it says record 1 of
10. This means we are currently on record 1. The * at the bottom is where you
would type in a new record.
If you are working along with the book, make up ten records with at least five people who have said yes to Kayak and no to Hiking. Notice that the address column is larger than the rest. It was too small but I made it larger just like you would in a spreadsheet by clicking and dragging it larger. You can also freeze columns by highlighting the columns and right clicking to get a popup menu and choosing Freeze Columns. This option can be found under Table Tools Datasheet Tab, Records Group, More Options (see why I said right click :) This will keep those columns from scrolling off the screen. I recommend that you freeze the first and last name fields since they identify the person for us the humans where as the computer likes that ID field. This will cause those two fields to jump to the left.
Queries
Remember I said that when you think of a database to think of a large number of records, for example 100,000. Let’s say from that 100,000, we want to know how many come from the state of Vermont. This question we have about our database is called a Query. Queries allow you to ‘pull out’ records from your database that meet a certain criteria. In this case my ‘query criteria’ was that the field called state was equal to Vermont.
Besides allowing us to pull out certain records we can also use a query to sort our database differently. Our data table is always sorted by the primary key. You can type your records in any order and they will be rearranged (sorted) by the primary key when you next open your table. With a Query we can sort the data table in any order that we like.
A query is the place where we put all of our calculated fields (formulas) in. There are also total queries and average queries that will provide a total or average for a particular field. In fact there are several more types of queries but they go beyond the scope of this course.
Often times we are not interested in all of the fields in our database. Besides pulling out the records that we want, a query will also allow us to pull out the fields that we are interested in. You can include all the records and all the fields if you want. When creating a query to sort your database you will most likely want to include all the information. Let’s start by creating a simple sort query and we will build from there.
Creating a Sort Query with Formulas
 Normally
what I do is create a query called qryTable that holds all of the fields in my
table plus all of the calculated fields as well. Generally I also sort this
query as well. Our primary key for the sample database is the fldFriendID
number, so our database is sorted by the ID number (or by how we type them in).
I would prefer to look at the database sorted alphabetically by last name and
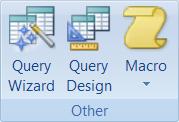
then first name. To get started Create
Tab, Other Group then click the Query
Design Icon. I find it easiest to create a query in Design View instead of using a wizard.
Normally
what I do is create a query called qryTable that holds all of the fields in my
table plus all of the calculated fields as well. Generally I also sort this
query as well. Our primary key for the sample database is the fldFriendID
number, so our database is sorted by the ID number (or by how we type them in).
I would prefer to look at the database sorted alphabetically by last name and
then first name. To get started Create
Tab, Other Group then click the Query
Design Icon. I find it easiest to create a query in Design View instead of using a wizard.
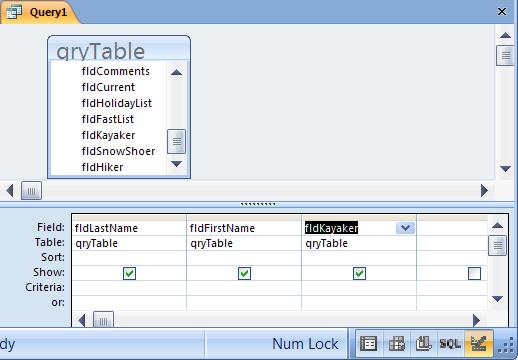
The first step is to choose the table (or query) that you want to perform the query on. We only have one table in our database so just click it and close the dialog box. What we are left with is a Query by Design Grid. The top part shows you the table(s) that you have chosen for this query. The bottom portion is your query by example (QBE) grid and this is where you will specify the ‘meat’ (or vegetable) of your query. You simply need to add the fields that you want in your query.
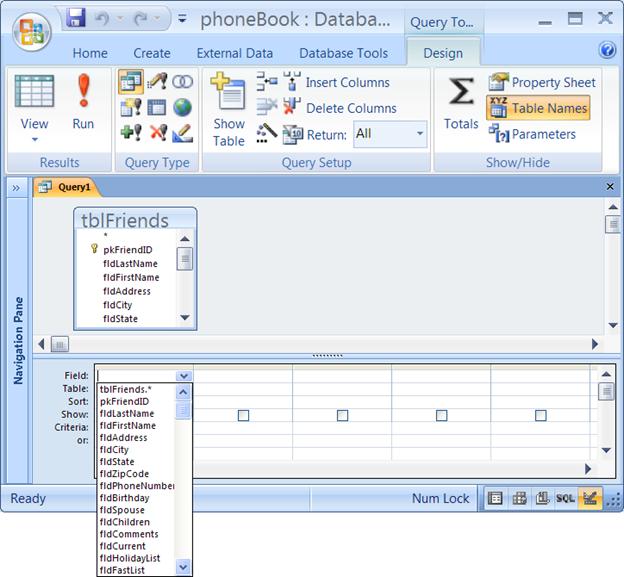
To add a field in your query click on the field row in the QBE grid so you can see the drop down list box. Click the list box so that you see all of your fields like shown above. You can simply choose the field that you want. You will notice just below the field row there is a sort row. Click the drop down arrow for this row you will have a choice of Ascending (abc), descending (zyx) or not sorted. Choose Ascending, as we want our database sorted by last name.
![]() You need to add First Name to your grid and
you also want to sort your database by First name as well. This time instead of
using the drop down list box, double click on fldFirstName on the table (top
portion) of the screen. This will place First Name in the next column on the
QBE grid. Sort First Name ascending in the same way as you did for Last Name.
Go ahead and push the run query button to perform the query.
This query will simply sort the database by Last Name and then First Name. Once
you press the Run button you will be in a Datasheet
view. You only have two fields, Last Name and First Name. To get the
rest of your database to show we need to add those fields to the QBE grid as
well. Choose the design view button
to get back to it.
You need to add First Name to your grid and
you also want to sort your database by First name as well. This time instead of
using the drop down list box, double click on fldFirstName on the table (top
portion) of the screen. This will place First Name in the next column on the
QBE grid. Sort First Name ascending in the same way as you did for Last Name.
Go ahead and push the run query button to perform the query.
This query will simply sort the database by Last Name and then First Name. Once
you press the Run button you will be in a Datasheet
view. You only have two fields, Last Name and First Name. To get the
rest of your database to show we need to add those fields to the QBE grid as
well. Choose the design view button
to get back to it.
The easiest way to get all the rest of the fields to the QBE grid is double click the blue bar of the table window on the top part of the query. This will highlight all of the fields. Then click and drag them to the grid. Since we have already added last and first name they will show up twice. If you place your cursor on top of the field name in the grid and move it up until it changes shape to a downward pointing arrow then click it will highlight that column. You can highlight both First and last name at the same time with a little click and drag motion. Pressing the delete key will remove the field from the grid (the extra ones). Then you can just double click the table bar to put all the fields on the grid. Don’t forget to resort by last and first name.
Go
ahead and run (execute) this query by clicking on the Run Query button. When
you run the query now it will show you the contents of your table but sorted by
last name. I want to add the calculated field to the grid. I like to put the
calculated fields first (just makes it easier to see really does not matter) so
in design view click the first column and choose the Insert Column icon ![]() and this will give you a blank column.
and this will give you a blank column.
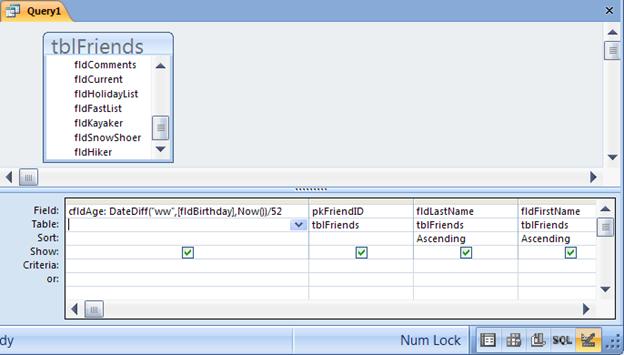
To put in a calculated field you type in the name of the calculated field with a colon (instead of an = sign like in Excel) and then the formula in the field name row of the QBE. I want a formula to show me the age of the person. Since it is a calculated field I will use a naming convention of cfld. The formula is shown below and uses the Date Difference function:
cfldAge: DateDiff("ww",[fldBirthday],Now())/52
You can put most any formula or function in a query. Your design view should look something like shown below. I did enlarge the column so that you can see the whole formula. Enlarging the column is similar to the way you would in a spreadsheet.
We
have not saved this query and we should. Since this query holds all the fields
including the calculated fields I name this query qryTable. Click on the Save icon and name this query
‘qryTable’ (there is no save as, Save as / Export is something
different). If you run the query it will
look similar to mine. Notice that the age has been formatted to only one
decimal place in my sample. This is because I set the property for that field
to be only one decimal place. Think of everything in the data base as being an
object and that all objects have properties. In the past we would highlight a
paragraph or spreadsheet cell and then format it. In the database you still
highlight it first (done by just clicking on it). To format an object you need
to change its properties. In Design View look for Query Tools Design Tab, Show Hide Group, ![]() .
As you look at the properties you can see the properties that this object has.
Not all objects have the exact same properties though some of them are the
same. I changed the two properties, format and decimal places on cfldAge.
.
As you look at the properties you can see the properties that this object has.
Not all objects have the exact same properties though some of them are the
same. I changed the two properties, format and decimal places on cfldAge.
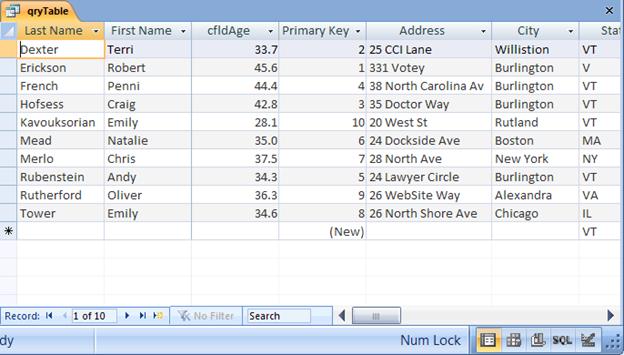
That is all there is to it. Of course you want to rearrange the data sheet view so that last name and first name are to the left. You should also freeze those two columns as well, which is done the same as you did for the table. I went ahead and did that and you should as well. In fact just always do that for any datasheet view. When you close the Query you will see your query name in the database window.
Creating a Query with equal type criteria
What we want to do is ask the question “Who likes to kayak?”. Of course I only have ten records so it would be really easy to just look at the table, but if I had thousands of records it would be a little more difficult. With a ‘select’ query we can pull out only the records that we are interested in looking at. Since we may want the calculated field we can base this query on qryTable. In fact most of the time I base all my queries on qryTable instead of the table itself. The information still comes from the table.
Create another new query in design view but add the qryTable instead of the table this time. Include the fields’ last name, first name and kayak on the grid. Your grid should look similar to this.
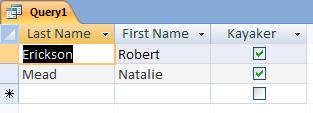 Notice the Criteria Row on the QBE Grid. This is
the place that we specify our query criteria. All you do is go to the criteria
row on the field that you are interested in and type in an example of what you
want to find. In this example, we want to show all the records where the Kayak
field has a yes (or the check box was checked). On the Criteria row for Kayak
we simply type in ‘yes’ for people who have a kayak. Go ahead and run this
query. I only have two people in my database that meets this query criteria.
You will notice that all the other records are hidden from view. All the
records are still in our database table we are just looking at the selected
records that we are interested in. Notice that the records are sorted by last
name since we based this query on qryTable.
Notice the Criteria Row on the QBE Grid. This is
the place that we specify our query criteria. All you do is go to the criteria
row on the field that you are interested in and type in an example of what you
want to find. In this example, we want to show all the records where the Kayak
field has a yes (or the check box was checked). On the Criteria row for Kayak
we simply type in ‘yes’ for people who have a kayak. Go ahead and run this
query. I only have two people in my database that meets this query criteria.
You will notice that all the other records are hidden from view. All the
records are still in our database table we are just looking at the selected
records that we are interested in. Notice that the records are sorted by last
name since we based this query on qryTable.
I may want to add phone number to this query so I could call these folks up or I may want to add the address so that I could write to them. You would just go back to design view and add the fields that you want to include. I am going to save this query as qryKayak.
Creating a Query with < or > type criteria
Okay, let’s create a new query based on qryTable. Include Last Name, First Name, and Age. Sort this query descending by Age. This will put the oldest person at the top of the list. Go ahead and run the query to see what it looks like and then get back to design view. Save this query as qryAge.
What I want now is a list of all the people are younger than 37. To do this all we need to do is type in <37 in the criteria row for the cfldAge column. Try this and run the query to see if it works. You should not see any records where the person older than 37.
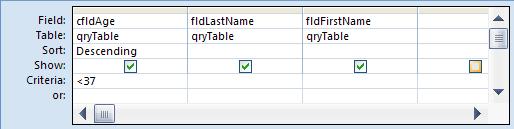
You can narrow this down further by including the AND operator. Return to design view and type in >30 and <37 in the criteria row. This will give us a list of people who are between the ages 30 and 37. Are you starting to get the idea? If your query does not work, try typing it in again from the beginning.
Creating a Parameter Query
You can also query your text fields as well. Create a new query based on the qryTable and include all the fields this time (remember it is easiest to highlight them and click and drag them to the grid all at once). Now say for example you want a list of all the people whose last name begins with M. All you need to do is to type in M* in the last name Criteria Row. The * is a wildcard symbol that replaces all the characters. When you type M* it will change to ‘Like “M*”’ in the Criteria row when you come back to design view so do not be surprised. Go ahead and give this a try. This will give you a list of all the people with a last name that begins with M. Now it would be silly to have a query like this for every letter of the alphabet!
What you can do is create what is called a parameter query which in this example will prompt you to enter the person’s last name. So delete the M* in the criteria row for last name and replace it with [Enter the Person’s Last Name]. Run this query. You will be given an input box that prompts you to ‘Enter the Person’s Last Name’ which is the text between the square brackets [ ]. That is pretty cool isn’t it? But, suppose you forget how to spell each person’s last name? It would be even better if you could put M* like we did earlier. Go to design view and add Like before and & “*” to the end of the criteria.
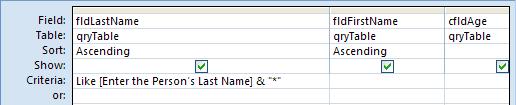
What this does is to take whatever letter you type and it adds (concatenates) the * to the end of it. Now run the query and only type in a letter or two. Don’t forget to save it! I saved mine as qryLastName. What do you think will happen if you do not enter in any thing in the input box? Well the criteria would then be like * so it will show you all your records.
Creating a Total Query
![]() Sometimes you want a query to get totals
from your database. For example how many people come from each City. Create a
normal select query including only two fields, fldCity and fldLastName and sort
this query by fldCity. Run the query and do a quick visual count of how many
people are from the first City. Back in design view on the Show/Hide Group choose Show Totals
icon.
Sometimes you want a query to get totals
from your database. For example how many people come from each City. Create a
normal select query including only two fields, fldCity and fldLastName and sort
this query by fldCity. Run the query and do a quick visual count of how many
people are from the first City. Back in design view on the Show/Hide Group choose Show Totals
icon.
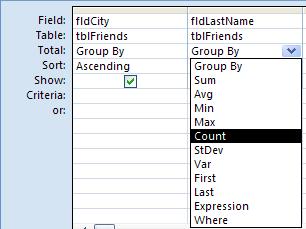 This will add a new Total row to your QBE
Grid. You will notice that I have grouped the query by fldCity and for
fldLastName I am going to Count how
many are in each group.
This will add a new Total row to your QBE
Grid. You will notice that I have grouped the query by fldCity and for
fldLastName I am going to Count how
many are in each group.
You will notice that there are several other functions that you can use (some are also available in EXCEL). In this case I need to count how many people there are. The count functions does just that counts how many records are in that group. Since I am grouping the records fldCity I will get a count of how many people live in each city. Run the query and see what you get!
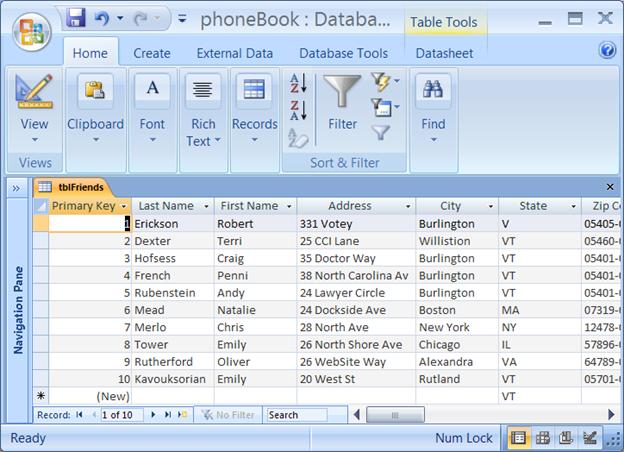
What’s Wrong With This Database
Looking at the data table below, what’s wrong with the datasheet view?
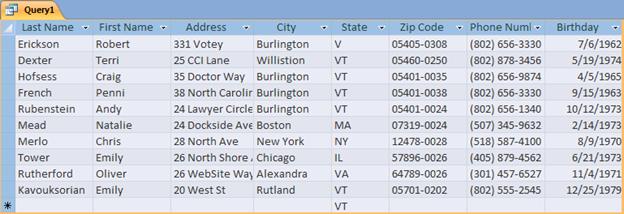
What stands out in my eyes is the fact that I cannot read the entire address. The columns need to be adjusted so that they are wide enough to read the information. You can adjust the column width the same as you did in spreadsheets by clicking and dragging with the mouse (or double clicking for the best fit). You should adjust the widths so that the information is readable. The same holds true for the name of the field, i.e. Phone number, adjust the column so we can read the whole caption.
You should also freeze the first and last name fields in this example so that you could scroll through the rest of the fields and still see whom the record information is about.
Not sure if it is wrong but it does not appear to be sorted and it has not been saved yet :)